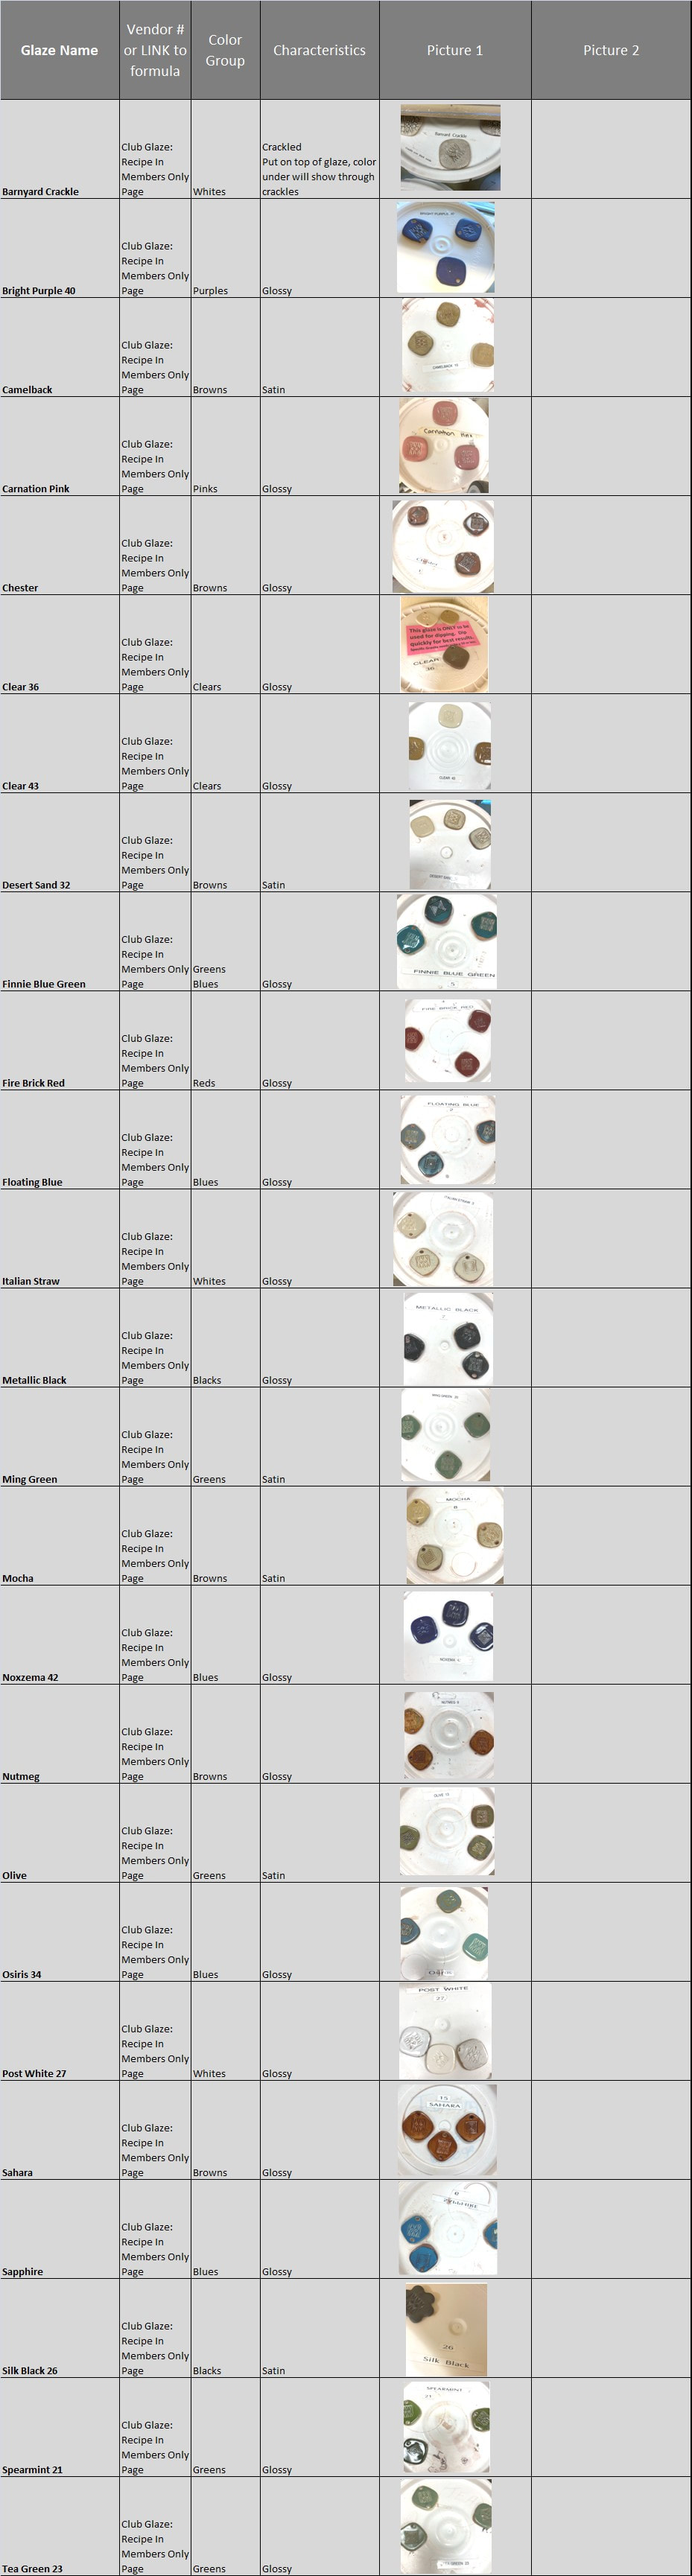
Clay Corner Glazes
Our Glaze team keeps the club stocked in MANY glazes, in convenient dipping buckets. This is a HUGE benefit for our club, and is the envy of other clay clubs and guilds. Some of the glazes are purchased dry and reconstituted. Other are created from scratch using complex formulas. Below find some basic information about our club glazes.
Purchased Club Glazes

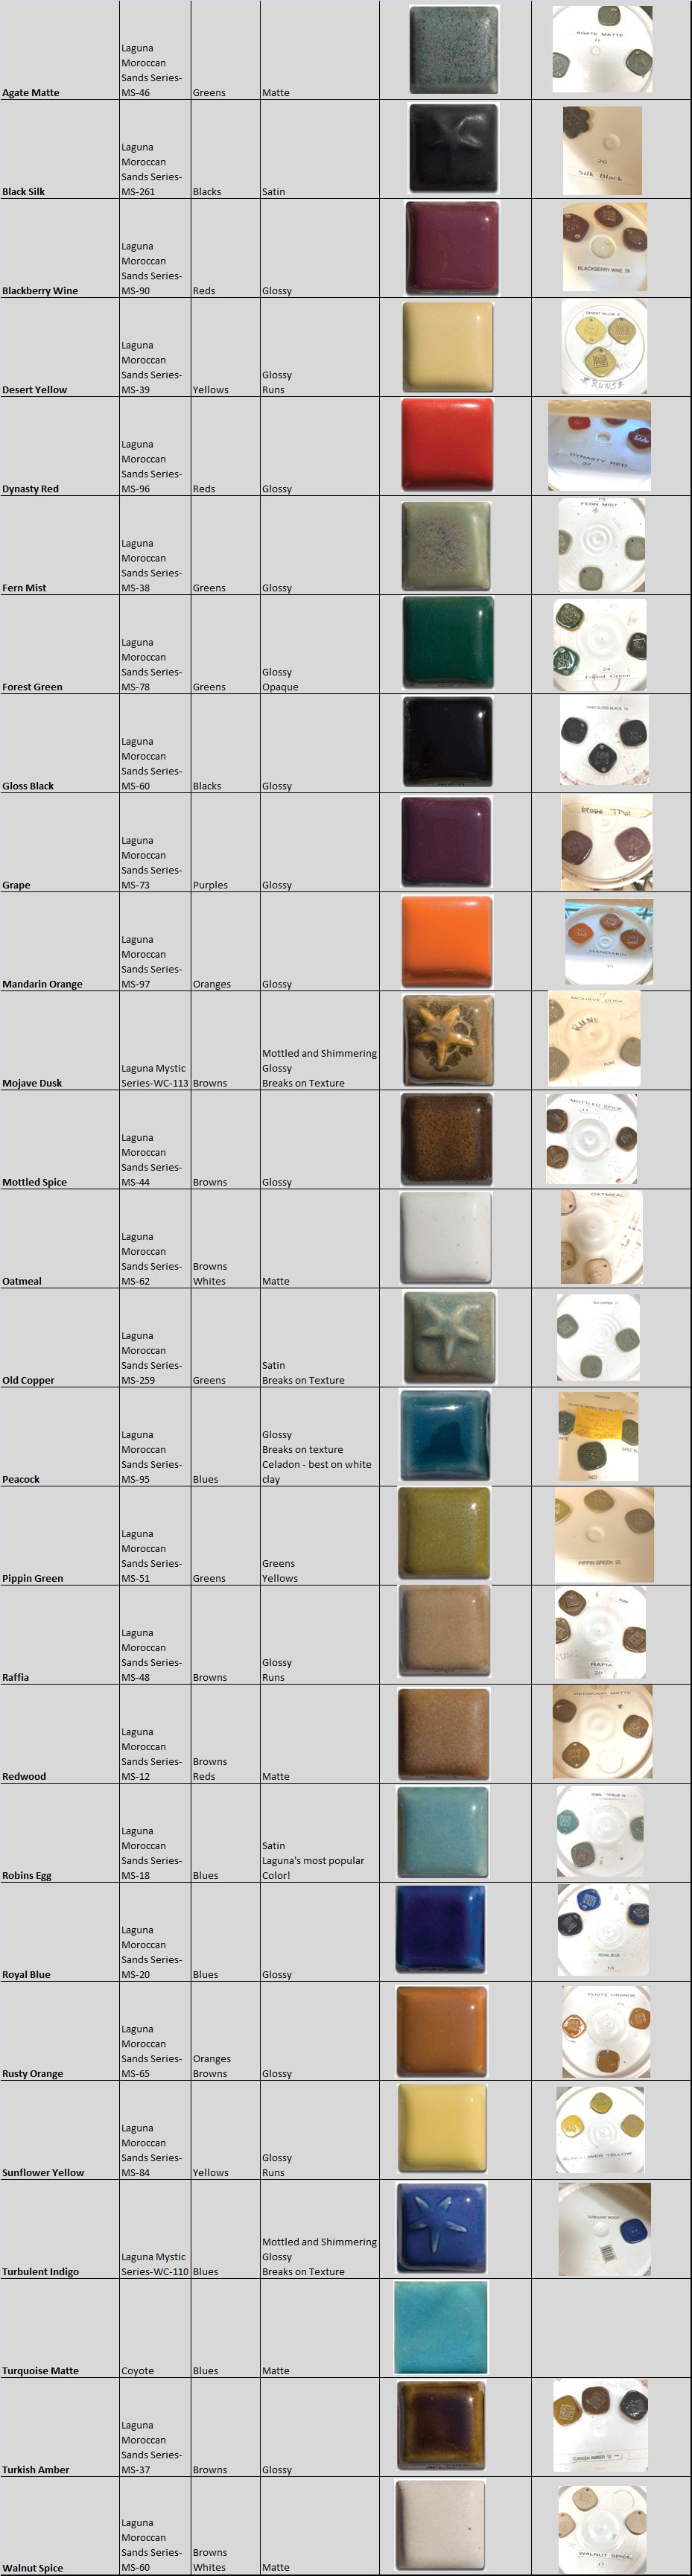
Club Mixed Glazes
What are Pottery Glazes?
Glazes are a coating added to clay pieces to add color, dimension, texture, or to make a piece waterproof. They are made of various chemicals and elements, and often, after they are fired, they don't look anything like they did when first applied. The chemical reactions and movement that occur to glazes during firing are part of what makes pottery exciting! There are often surprises when your piece comes out of the kiln.
Learning about glazes is an important part of pottery. Not all glazes are safe for food. Some glazes are stable, and some run and drip during firing. Some can be fired at low temperatures and others can only be fired at high temperatures. Some look bright and vibrant after low firing, but lose their color after high firing.
The Clay Corner Glaze Team has prepared the documents below for your convenience -for viewing and/or printing:
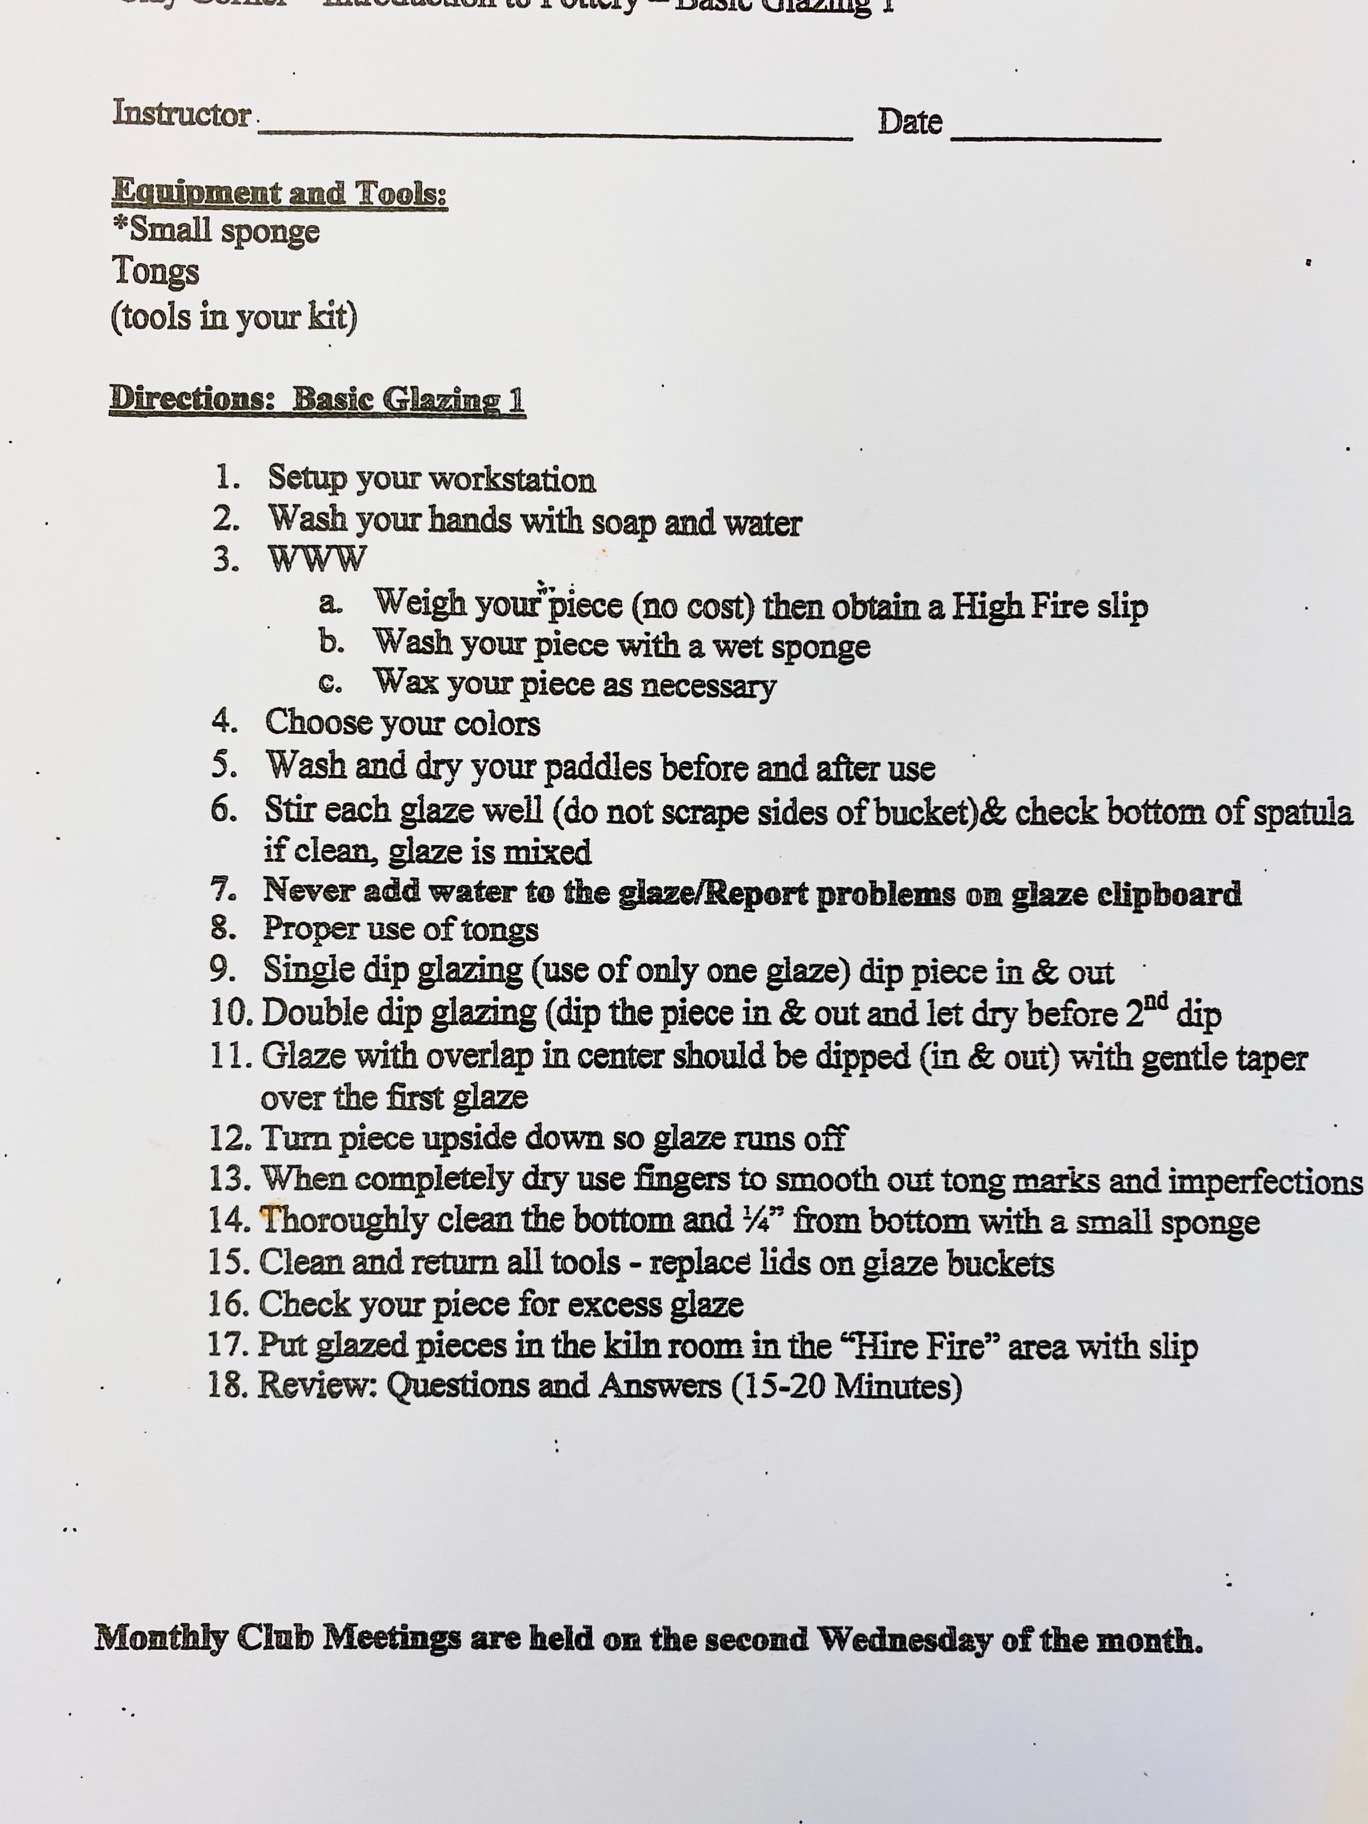
BASIC GLAZING
BASIC GLAZING II
The basics covered in these documents are also outlined below:
Learning about glazes is an important part of pottery. Not all glazes are safe for food. Some glazes are stable, and some run and drip during firing. Some can be fired at low temperatures and others can only be fired at high temperatures. Some look bright and vibrant after low firing, but lose their color after high firing.
The Clay Corner Glaze Team has prepared the documents below for your convenience -for viewing and/or printing:
BASIC GLAZING
BASIC GLAZING II
The basics covered in these documents are also outlined below:
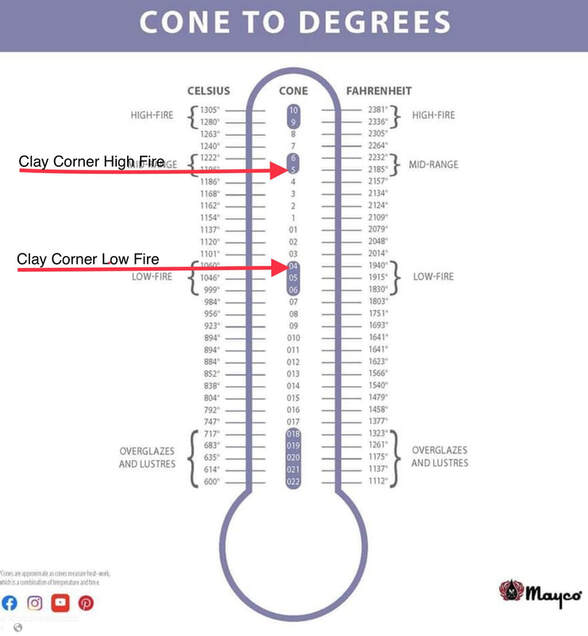
Clay Corner Firing Temperatures
Types of Glazes
Low Fire Glazes: Read your glaze labels carefully, if you are using glaze from outside the club. Low fire glazes perform best in bisque firing (cone 05). They may lose their colors at higher firings. If in doubt, check the glaze website for pictures at various temperatures.
Mid Fire Glazes: All the bucket glazes in our club are mid-fire - made to work best at cone 5. Purchase glazes listed as cone 5-6 are also mid-fire glazes.
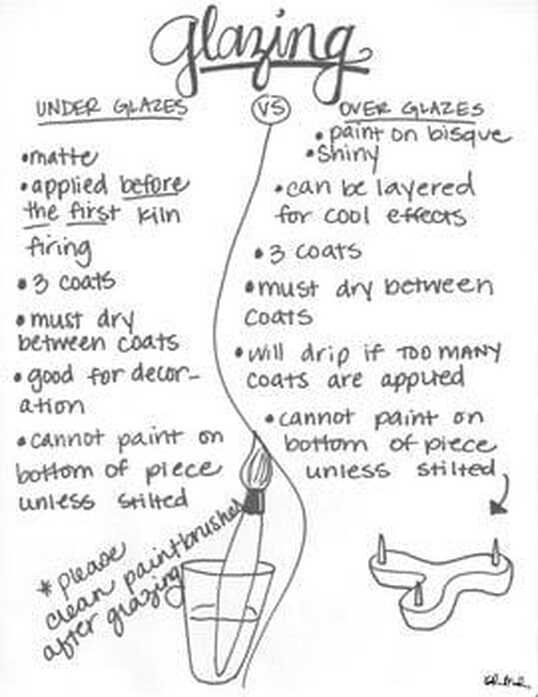
Under glazes: Under glazes can be applied to wet, bone dry, or bisque pottery. They are normally matte finish, and need a clear coat to make them glossy. Under glazes, for the most part, are just coloored clay, and thus usually don't stick to the kiln shelves. However, some under glazes do have some glaze that will stick, so always be careful and don't glaze the bottom or test it on a trial piece first.
Stroke and Coat: Stroke and coat is called an under glaze sometime, since it can be applied to wet, bone dry or bisque pottery. However, unlike regular under glazes, it fires shiny at low fire. It can also be fired at mid-range (cone 5-6) but sometime the colors will change. Check the Mayco Stroke and Coat website to see pictures are various temperatures.
Oxides: Oxide are minerals that can be brushed or washed on bisqueware, and then wiped off the leave color in the textures. You can also leave it on to change th e appearance of the clay. Iron Oxide is most commonly used at our club, but other oxides are available (cobalt, etc.). Oxide donot stick to kiln shelves, so you can oxide the bottom of a piece without needing to stilt.
Specialty Glazes (crystals, metallic, etc.): You can purchase special glazes that have crystals or metallic finish. Just read the label to make sure they are compatible with our mid-range clay and firing schedules. Populare speciality glazes include Jungle Gems and Elements, both from Mayco.
Slip: You can also"glaze" with slip by applying it to green ware when it is still damp. You can b ruc it on, or "slsip trail" on patterns with a slip trail applicator. Slip is just liquid clay, so can be applied anywhere on your piece w ithout fear of sticking to the kin shelf.
Mid Fire Glazes: All the bucket glazes in our club are mid-fire - made to work best at cone 5. Purchase glazes listed as cone 5-6 are also mid-fire glazes.
Under glazes: Under glazes can be applied to wet, bone dry, or bisque pottery. They are normally matte finish, and need a clear coat to make them glossy. Under glazes, for the most part, are just coloored clay, and thus usually don't stick to the kiln shelves. However, some under glazes do have some glaze that will stick, so always be careful and don't glaze the bottom or test it on a trial piece first.
Stroke and Coat: Stroke and coat is called an under glaze sometime, since it can be applied to wet, bone dry or bisque pottery. However, unlike regular under glazes, it fires shiny at low fire. It can also be fired at mid-range (cone 5-6) but sometime the colors will change. Check the Mayco Stroke and Coat website to see pictures are various temperatures.
Oxides: Oxide are minerals that can be brushed or washed on bisqueware, and then wiped off the leave color in the textures. You can also leave it on to change th e appearance of the clay. Iron Oxide is most commonly used at our club, but other oxides are available (cobalt, etc.). Oxide donot stick to kiln shelves, so you can oxide the bottom of a piece without needing to stilt.
Specialty Glazes (crystals, metallic, etc.): You can purchase special glazes that have crystals or metallic finish. Just read the label to make sure they are compatible with our mid-range clay and firing schedules. Populare speciality glazes include Jungle Gems and Elements, both from Mayco.
Slip: You can also"glaze" with slip by applying it to green ware when it is still damp. You can b ruc it on, or "slsip trail" on patterns with a slip trail applicator. Slip is just liquid clay, so can be applied anywhere on your piece w ithout fear of sticking to the kin shelf.
How to Apply Glaze
In the Clay Corner, we often DIP our pieces in our glaze buckets. That's a fast, easy way to get an even coat of glaze on your piece.
People can also apply their glazes by brush, sponge, dripping, trailing, splattering, and spraying. Each method gives a different look.
People can also apply their glazes by brush, sponge, dripping, trailing, splattering, and spraying. Each method gives a different look.
DIPPING: When dipping a pieces, there are several important steps to follow:
- TICKET: Club member's earn the right to glaze by monitoring or performing other club duties. Ask the monitor for a glaze slip, and they will check the member book to make sure you are up to date in monitoring. Exceptions are made for new member class work, and our members over 80 years of age. Your choices are:
- Low Fire Glaze slip: use this when placing green ware on the low fire shelf, for a bisque firing.
- High Fire Glaze Slip: use this when placing bisqued pieces on the high fire shelf for firing.
- Personal Glaze Slip: Use this when using your own glazes. The monitor will mark this slip with a low or high fire stamp. It is imperative that you know about any personal glaze you are using. READ THE LABEL. Not all glazes are the same; some require low fire only, some lose their color in high firing, and some will melt or "jump" off a piece if its not comparable with your clay or other glazes you have used, and potentially ruin a glaze shelf or worse. When in doubt, ask a member from our glaze team.
- WASH YOUR HANDS: This will remove oils and lotions that could affect your glaze applications. Glaze will NOT stick to oily surfaces. Remember, our skin has oil too. Clean hands are a great tool.
- CLEAN: Clean your piece - make sure your piece (at the bisque stage) is free from dust. Wipe with a damp sponge. This keeps our glazes free from debris, which can ruin the glaze finish. Do NOT immerse in water if you are going to glaze immediately.
- Dry pottery, more glaze will be absorbed resulting in a thick layer of glaze and increased risk of glaze running.
- Wet pottery, glaze may run off the bisque and will not give you an even coat.
- Moist pottery, will give you a thinner andmore even coat.
- Dry pottery, more glaze will be absorbed resulting in a thick layer of glaze and increased risk of glaze running.
- WAX: Every piece that goes in the kiln will touch the kiln shelf in some manner. There can be no glaze on any part of the piece that is touching the kiln shelf, or the piece will stick to the shelf, ruing both your piece and the shelf. We often prevent glaze from sticking to the bottom of apiece by waxing the area that will touch the shelf. Waxed areas make removing glaze easy. There are other tools that can be used to prevent glazed ares from touching the shelf. For more information on these tools, check out our About Our Kilns page.
- You can protect any area on your piece that you don't want to glaze by using
- Wax, or liquid wax release
- Blue elastic peel off mask
- Masking or other tape.
- Wax, or liquid wax release
- You can protect any area on your piece that you don't want to glaze by using
- STIR: Stir the glaze well, so that there is no sediment let on the bottom. Depending on the glaze and when it was last used this may take from 20 to 100+ stirs with the stainless paddle.
- SUBMERGE: Use tongs or other tools to submerge your piece. Usually dipping in and out, with no holding in the glaze, applies just the right amounts of glaze.
- INSIDE VESSELS: When glazing the inside of a mug or vase, etc., it is usually easier to fill the vessel with glaze, and then immediately empty it back into the bucket.
- LAYERING: You can dip a piece in more than one color, for interesting overlap effects. It is imperative (to avoid contaminating one glaze with another) that you do this only after the first coat of glaze if completely dry. You can tell when it's dry when there are no more wet spots and all the glaze is powdery.
- DRY: Take your glazed piece back to your station, and let it dry.
- CLEAN: Inspect your piece and make sure there are no drips or uncovered spots, and make sure all glaze is removed from the portion of the piece that will sit on the kiln shelf. You may use your finger or a brush on dried glaze to remove bubbles, smooth our drips and more.
OTHER METHODS OF APPLYING GLAZE: Most of the steps are the same as dipping, with a few exceptions.
BRUSHING ON GLAZE
BRUSHING ON GLAZE
- Steps 1 through 4: Same as dipping
- STIR: Stir or shake the glaze well, so that there is no sediment let on the bottom.
- APPLY: Use brushes or other tools to apply your glaze. Most glazes require three coats of glaze to get an effect similar to dipping. Use a fan or mop brush that holds a lot of glaze to apply to large areas, Apply each coats glaze in alternate directions, letting each coat dry thoroughly before applying the next. you may also use smaller brushes for detail work, syringes, bulbs, sponges, toothbrushes, and much more to apply glaze for interesting effects.
- DRY and CLEAN: Same as dipping
Helpful Hints
|

|